Bassetassen blog by Sebastian Holager
Using Managed Identity in Plugins
When the 2024 Wave 1 was annonced the article about managed identities in Dataverse plugins really got me excited. We have been using managed identites in Azure services for a long time and the possablility to also be able to use that in plugins is very exciting stuff. The less we need to rely on credentials the better.
The preview for this feature dropped in August and I have finally had the time to try out and see how it works. I must admit it did not felt very mature to set this up yet, but then again, it is just in preview :D
I followed the documentation from Microsoft learn here: https://learn.microsoft.com/en-us/power-platform/admin/set-up-managed-identity
In my example I will create a plugin using the managed identity to get a secret from Azure Key Vault and just print it out in the trace log so show that it has actually got the secret.
Identity
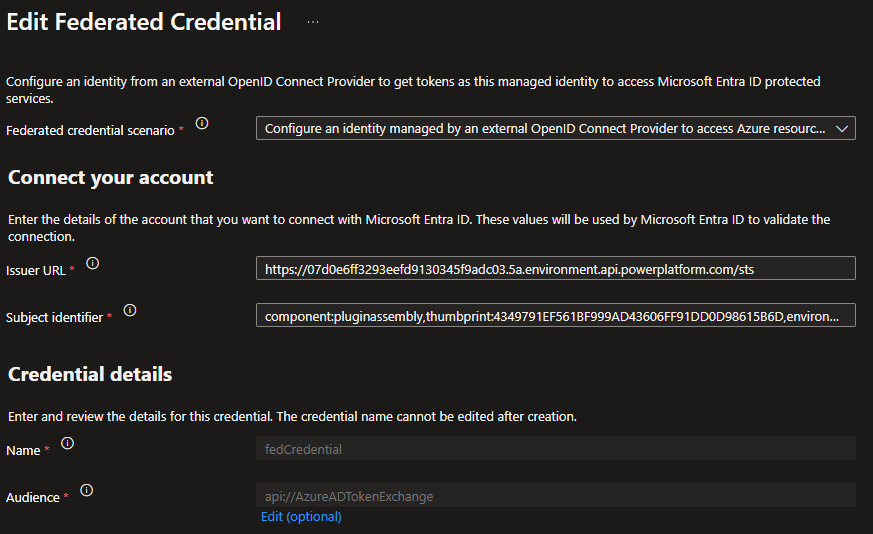
I started with creating a user-assigned managed identity (you can also use app registrations). Then under the federated credential I created a new one and added a issuer URL and an Subject identifier as the documentation shows.
In the documentation it shows that the format for the Issuer URL is: https://[environment ID prefix].[environment ID suffix].enviornment.api.powerplatform.com/sts
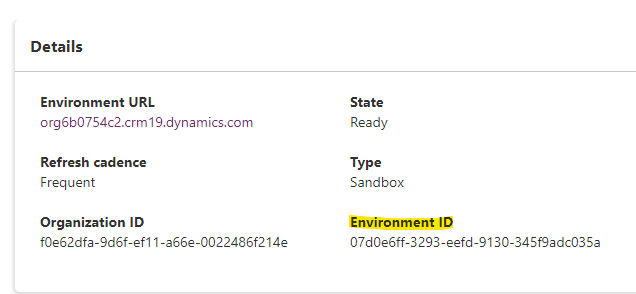
The way I found the environment id was going over to https://admin.powerplatform.microsoft.com/environments and clicking in to my environment, here you can see the ID:

The documentation says that the environment id should be split up in a prefix and a suffix where the suffix is the last two charathers and the prefix is everything except the last two. In the documentation you can see that the guid is stripped for dashes.
So for my environment with environment id 07d0e6ff-3293-eefd-9130-345f9adc035a, the environment prefix is 07d0e6ff3293eefd9130345f9adc03 and the suffix is 5a.
For the Subject identifier the format is: component:pluginassembly,thumbprint:<<Thumbprint>>,environment:<<EnvironmentId>>. The thumbprint you get from the certificate you will sign the plugin assembly with.
So with my setup this is the Issuer URL and Subject identifier.

Issuer URL: https://07d0e6ff3293eefd9130345f9adc03.5a.environment.api.powerplatform.com/sts
Subject identifier: component:pluginassembly,thumbprint:4349791EF561BF999AD43606FF91DD0D98615B6D,environment:07d0e6ff-3293-eefd-9130-345f9adc035a
One thing I did wrong here when setting this up was not including the dashes in the environment id in Subject identifier and I then got an error in plugin traces when testing this out. The good thing was that the error captured in the trace wrote out the correct Subject identifier for the plugin.
Azure Role Assignemnt
In Azure Portal I have given my Managed Identity the Key Vault Secrets User role on my Key Vault.

Plugin
For the plugin code it is worth looking at the IManagedIdentityService and the use of AcquireToken with the scope for Key Vault, here I get the token that I use to get the secret from Key Vault. Other then that I just write out the content of the response from Key Vault.
public void Execute(IServiceProvider serviceProvider)
{
    var tracingService = (ITracingService)serviceProvider.GetService(typeof(ITracingService));
    tracingService.Trace("In execute method.");

    tracingService.Trace("Getting IManagedIdentityService");
    var managedIdentityService = (IManagedIdentityService)serviceProvider.GetService(typeof(IManagedIdentityService));
    tracingService.Trace("Getting token");
    var token = managedIdentityService.AcquireToken(new[] { "https://vault.azure.net/.default" });

    tracingService.Trace($"Getting secret");
    var secret = GetSecretFromKeyVault(token).GetAwaiter().GetResult();
    tracingService.Trace($"Secret: {secret}");
}

private async Task<string> GetSecretFromKeyVault(string accessToken)
{
    using (var httpClient = new HttpClient())
    {
        httpClient.DefaultRequestHeaders.Authorization = new System.Net.Http.Headers.AuthenticationHeaderValue("Bearer", accessToken);

        var response = await httpClient.GetAsync($"{_keyVaultUrl}secrets/{_secretName}?api-version=7.0");

        if (response.IsSuccessStatusCode)
        {
            var responseContent = await response.Content.ReadAsStringAsync();
            return responseContent;
        }
        else
        {
            throw new Exception($"Failed to retrieve secret from Key Vault. Status Code: {response.StatusCode}");
        }
    }
}
After the plugin is compiled you need to sign it for it to work. In my example I just use a self-signed certificate I created on my machine (it was the thumbprint from this certificate that I use in Subject identifier), but this is not an recommended approach for other then testing. I have my self-signed certificate registered as a code signing certificate so I then just use this command to sign it:
signtool sign /fd SHA256 /a MIPlugin.dll
If you don’t sign the plugin and you test with it you will get an error message like this
Plugin assembly must be signed with a valid certificate to use Managed Identity
If you need to create a self-signed certificate look at the powershell command New-SelfSignedCertificate.
When the plugin is compiled and signed you can register as you always do with pluginregistration tool.
Register managed identity in Dataverse
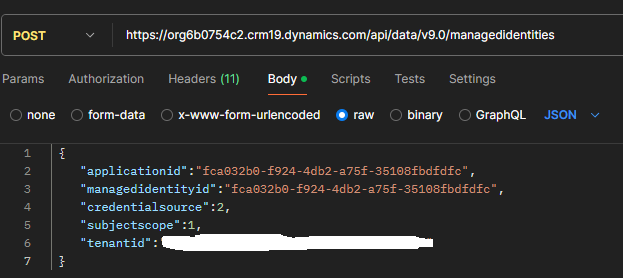
Now you have to do a final step to register this in Dataverse and here is where it feels very preview. You have to do a POST request to the managedidentities endpoint in Dataverse API with the following body:
 {
    "applicationid":"<<appId>>",
    "managedidentityid":"<<anyGuid>>",
    "credentialsource":2,
    "subjectscope":1,
    "tenantid":"<<tenantId>>"
 }
Since the managedidentityid property takes any id I just re-used the application id, here is a picture of my request from Postman:

Then we have to do a PATCH request to relate the managed identity record we just created with the plugin assembly. The hardest part here was finding the correct id to the plugin assembly. I used this query in the API to find the ID:
https://org6b0754c2.crm19.dynamics.com/api/data/v9.0/pluginassemblies?$filter=name eq 'MIPlugin'&$select=pluginassemblyid
With the following result:
{"@odata.context":"https://org6b0754c2.crm19.dynamics.com/api/data/v9.0/$metadata#pluginassemblies(pluginassemblyid)","value":[{"@odata.etag":"W/\"3351749\"","pluginassemblyid":"229afa6b-6fbe-4252-9fff-cb5c2114bc14"}]}

Trying it out
Now I am ready to test the plugin. I have created a secret in my Key Vault and I have turned on tracing in my environment. My plugin triggers on creation of account so I create a new one and save it and wait a few seconds for my trace log record to appear. And as you can see from the picture below we got the secret from our Key Vault :satisfied:

Setup TeamCity with HTTPS
At work we have recently moved our CI server and made it available without having to use VPN. As we did this switch we also made it accessible only thru HTTPS. Here are the steps we did to make that work.
First we copied out pfx file to the CI server, then we had to make a few adjustments to some of the config files.
In TeamCity/conf/server.xml we added this element, here you can see the path to the pfx file and the password for the file.
<Connector port="443" protocol="org.apache.coyote.http11.Http11NioProtocol"
    SSLEnabled="true"
    scheme="https"
    secure="true"
    connectionTimeout="60000"
    redirectPort="8543"
    clientAuth="false"
    sslProtocol="TLS"
    useBodyEncodingForURI="true"
    keystoreFile="C:\TeamCity\conf\cert.pfx"
    keystorePass="password"
    socket.txBufSize="64000"
    socket.rxBufSize="64000"
    tcpNoDelay="1"
    />
After a restert of the TeamCity service it is now possible to reach the server on HTTPS.
The next step for us was to force the use of HTTPS, so we had to make a change to TeamCity/conf/web.xml. We added this XML to the file just before the web-app closing tag.
    <security-constraint>
        <web-resource-collection>
            <web-resource-name>Restricted URLs</web-resource-name>
            <url-pattern>/*</url-pattern>
        </web-resource-collection>
        <user-data-constraint>
            <transport-guarantee>CONFIDENTIAL</transport-guarantee>
        </user-data-constraint>
    </security-constraint>
</web-app>
After a restart we can still access TeamCity over HTTPS, but when using HTTP the redirect goes to HTTPS on port 8543. We open up TeamCity/conf/server.xml again and change one line in the HTTP connector. Here we change the redirectPort from 8543 to 443.
<Connector port="80" protocol="org.apache.coyote.http11.Http11NioProtocol"
               connectionTimeout="60000"
               redirectPort="443"
               useBodyEncodingForURI="true"
               socket.txBufSize="64000"
               socket.rxBufSize="64000"
               tcpNoDelay="1"
    />
After another restart of the TeamCity service all is working as expected and our users is forced over on HTTPS.
Create an entity using the WebApi with lookup values
When creating a new entity with the WebApi for Dynamics 365 the documentation looks pretty clear. It also looks straight forward when associating the new entity with an existing one. See here for a reference.
This example from the previous link creates an account and set the primary contact.
{
    "name":"Sample Account",
    "primarycontactid@odata.bind":"/contacts(e13072b3-81ba-e711-8108-5065f38ba391)"
}
When looking at the code one would think that it is the logicalname for the attribute that is in use here and we only need to append the @odata.bind part. But as soon we start to associate custom entities we will see that it is not the logicalname of the attribute but rather the associatednavigationproperty.
Here is the result querying the newly created account with prefer header set to odata.include-annotations=”*”
{
    "@odata.context": "https://someorg.api.crm4.dynamics.com/api/data/v8.2/$metadata#accounts(_primarycontactid_value)/$entity",
    "@odata.etag": "W/\"1434863\"",
    "_primarycontactid_value@OData.Community.Display.V1.FormattedValue": "Sebastian Holager",
    "_primarycontactid_value@Microsoft.Dynamics.CRM.associatednavigationproperty": "primarycontactid",
    "_primarycontactid_value@Microsoft.Dynamics.CRM.lookuplogicalname": "contact",
    "_primarycontactid_value": "e13072b3-81ba-e711-8108-5065f38ba391",
    "accountid": "72bc7a32-82ba-e711-8108-5065f38ba391"
}
When querying with this prefer header we get to see the name of the associatednavigationproperty. In this example it’s not possible to conclude if it is the logicalname or the associatednavigationproperty that is used.
When setting a lookup on a custom attribute the associatednavigationproperty is set to the same as the schemaname, this is confusing because this is not the case on the standard lookup attributes as we saw on the primarycontactid example above. Schemaname for primarycontactid is PrimaryContactId.
Here is a example on a custom entity, notice the case-sensitivity. Here the associatednavigationproperty is equal to the schemaname of the attribute.
{
    "new_Testentitet@odata.bind": "/new_testentitets(0FB7A14C-8DBA-E711-810A-5065F38BD3C1)"
}
Now let’s look at a custom activity, then things really starts to be interesting.
In this example I will create a custom activity. Here is the body of the POST.
{
    "regardingobjectid_incident@odata.bind": "/incidents(5CD45010-6752-E711-80FA-5065F38BA391)",
    "crmntime_Case_crmntime_TimeEntry@odata.bind": "/incidents(5CD45010-6752-E711-80FA-5065F38BA391)",
    "crmntime_HourTypeMain_crmntime_TimeEntry@odata.bind": "/crmntime_hourtypes(2b645ea3-7352-e711-80fa-5065f38ba391)"
}
We associate the same incident in the custom crmntime_case attribute and the standard regardingobjectid attribute of an activity. We also associate an crmntime_hourtype that is a custom attribute referencing a custom entity.
This is the result when querying the newly created recored.
{
    "_regardingobjectid_value@OData.Community.Display.V1.FormattedValue": "Test",
    "_regardingobjectid_value@Microsoft.Dynamics.CRM.associatednavigationproperty": "regardingobjectid_incident_crmntime_timeentry",
    "_regardingobjectid_value@Microsoft.Dynamics.CRM.lookuplogicalname": "incident",
    "_regardingobjectid_value": "5cd45010-6752-e711-80fa-5065f38ba391",
    "_crmntime_case_value@OData.Community.Display.V1.FormattedValue": "Test",
    "_crmntime_case_value@Microsoft.Dynamics.CRM.associatednavigationproperty": "crmntime_Case_crmntime_TimeEntry",
    "_crmntime_case_value@Microsoft.Dynamics.CRM.lookuplogicalname": "incident",
    "_crmntime_case_value": "5cd45010-6752-e711-80fa-5065f38ba391",
    "_crmntime_hourtypemain_value@OData.Community.Display.V1.FormattedValue": "Test type",
    "_crmntime_hourtypemain_value@Microsoft.Dynamics.CRM.associatednavigationproperty": "crmntime_HourTypeMain_crmntime_TimeEntry",
    "_crmntime_hourtypemain_value@Microsoft.Dynamics.CRM.lookuplogicalname": "crmntime_hourtype",
    "_crmntime_hourtypemain_value": "2b645ea3-7352-e711-80fa-5065f38ba391"
}
When looking at this result we can see that regardingobjectid_incident is not the associatednavigationproperty, but using regardingobjectid_incident_crmntime_timeentry@odata.bind also work.
Notice that the associatednavigationproperty is case-sensitive and on custom relationships on custom activities it looks like it take the form of attribute schema name_entity schema name. In this example for the hourtypemain lookup the attribute schema name is crmntime_HourTypeMain and this lookup attribute exist on enity with schema name crmntime_TimeEntry so the associatednavigationproperty becomes crmntime_HourTypeMain_crmntime_TimeEntry. This is different from other custom lookup attributes on custom entities where the form of associatednavigationproperty is equal to schemaname of the attribute.
I hope these examples can help you out when exploring the Web Api and associating entities when creating and updating entities.
Building C# 7 with TeamCity
We have started using some new language features from C# 7 lately and then some builds on Team City started failing. Luckily I remembered my post from the time we started using C# 6 features. You can find that post here
error CS1003: Syntax error, ',' expected
The builds were using the Visual Studio sln build configuration and was set to Visual Studio 2015. I changed this to Visual Studio 2017, but then there was no compatible agent. I then installed the Build Tools for Visual Stuido 2017 and restarted the agents, now everything is working as expected.
You find the Build Tools for Visual Studio 2017 here. Scroll all the way to the bottom and you find the download link or just search for Build tools.
Accessing Dynamics 365 from Ubuntu
From home when using Dynamics 365 on a Ubuntu machine I’m quite regularly getting the mobile forms when accessing Dynamics 365. So today I wanted to investigate this some more.
I start with Firefox and logged in to http://portal.office.com. When I click on the Dynamics 365 tile, I get an error on the new app page.

When I close this dialog there is a blank page with portal menu on the top. Refreshing the page or pressing the sync button does not help.
I then try to go directly to my instance of Dynamics 365 with the url https://{organization}.crm4.dynamics.com. Then we are logged in to the mobile site.
So no luck with Firefox, let’s try Chrome.
When logging in to the portal with Chrome and clicking on the Dynamics 365 tile there is no error and I can see all my apps. Clicking on one of them I get to my organization.
If I type in the address to the organization as I tried with Firefox, I get the mobile site as I did with Firefox.
So to summarize I have to use Chrome and log in through portal.office.com or home.dynamics.com to avoid getting the mobile site of Dynamics 365 on a Ubuntu machine.
